July 12, 2013

4th of July & Swatches

I hope everyone had a great 4th of July.  Sorry this post is a little late, but I was experimenting with a new format with my pictures.  With this manicure, I decided to go simple.  Do some solid colors because I haven't done that in a while.   Both hands were different, but I just took pictures of one.  


Since I did some solid colors, I'm deciding that I swatch them.  These colors were bold and perfect for this holiday.


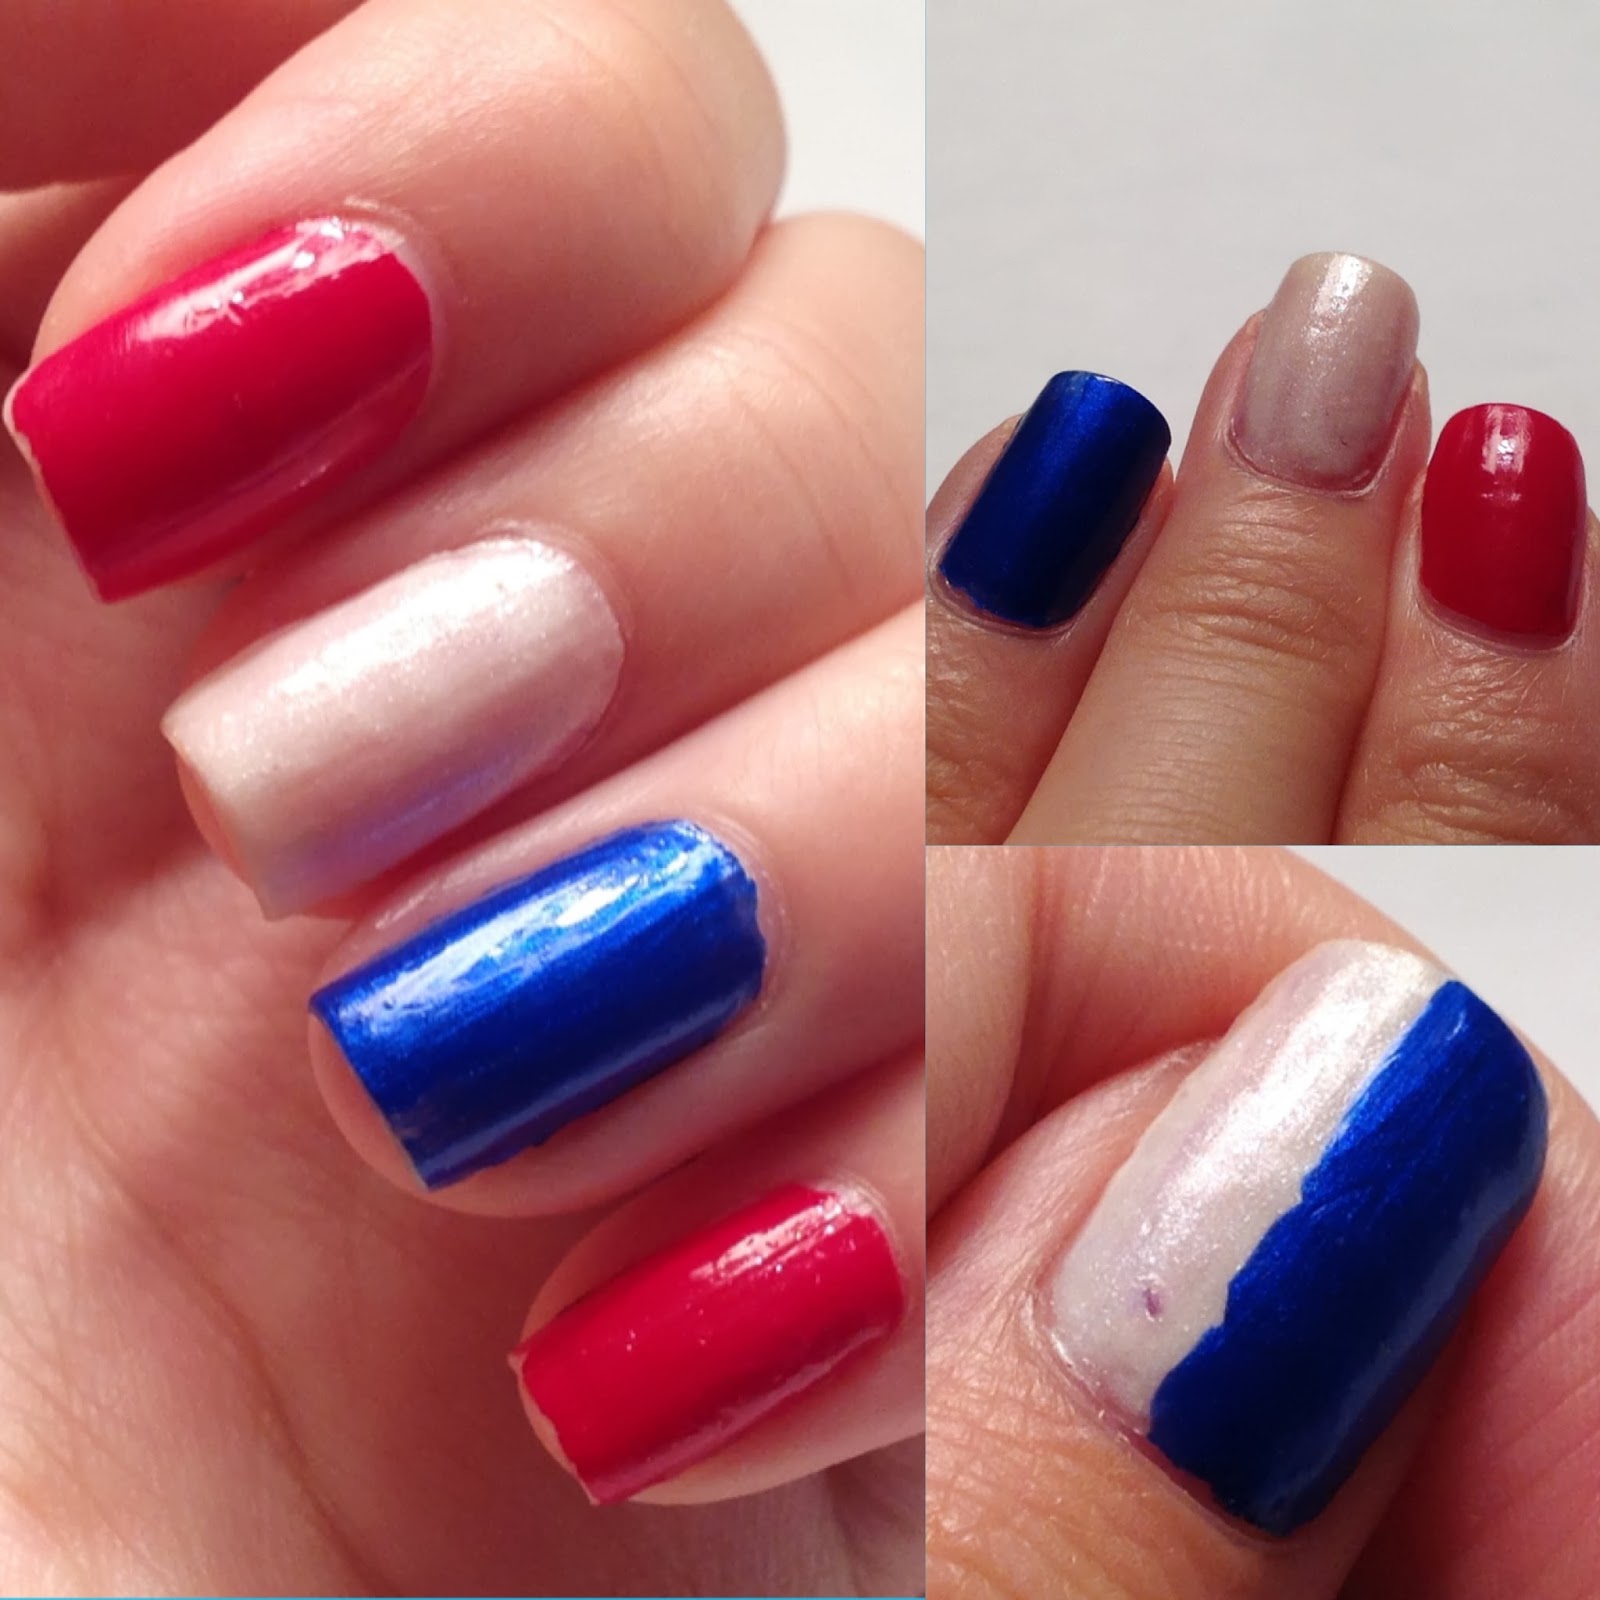
Let's start with the blue or Saved by the Blue by Wet n Wild. This polish is very opaque, so I only needed 1-2 coats, 2 to make it darker.  As you can see in the picture, the blue looks matte, which it isn't, but a matte top coat on this color would look pretty good.  

Next color, the white polish or Break the Ice by Wet n Wild was a bit sheer, so I needed 3-4 coats.  However, I liked this color better than a plain old white, since I was going for something a bit different.  Break the Ice is lighter than white and has a glittery shimmer to it.

And finally, the red, Cherries in the Snow by Revlon.  I applied 2 coats, and they dried completely within minutes. This color reminded of Snow White's apple or a perfect red lipstick.  It's not too dark nor too light, and it's the perfect amount of boldness.

June 9, 2013

Darkly Cracked Tips

It was about time I did another French Manicure.  I love doing them because they're fast and super easy to do.  I didn't paint a base coat so it would be easier to remove.  I painted two coats of purple for the tips.  Originally, I wanted to have a gradient effect fading to black, but then, I decided to take a cotton swab and randomly dab on some black polish to give it a darker shade.  You can kind of see where I dabbed on the black because the black polish has very tiny sparkles in it.  On the thumb, I painted a thick coat of silver crackle for something different. 


Purple: Flair by Sally Hansen, Black: Heavy Metal by Wet n' Wild, Silver Crackle: Silver Shatter by OPI


The silver and purple go very well together.


May 13, 2013

Cool Colored Stripes

I had a ceremony this past Saturday, and I had to do my nails, obviously.  So, I decided to match them with my dress.  At first, I wanted to do an ombre, but for some reason, no color showed up on my nails when I stamped the sponge on them.  I believe I didn't paint enough polish on the sponge.  Anyway, I decided to skip that and come back to it when I had more time.  I chose the three colors that I had that matched with my dress.  I felt disappointed that I didn't have the teal color from the dress, so I substituted it with my light blue.  (There is a picture of my dress below, so you know what I'm talking about.) I had one before, but it got thick, and I had to throw it out. :(  Overall, the dress was made up of cool colors, and I decided to go with these colors below.


From the cuticle down, I used the colors Mint Fusion by Wet n Wild, Dreamer by Revlon, and Saved by the Blue by Wet n Wild.


A swatch of my dress.  See the pretty teal?

April 21, 2013

Criss-Cross GrapeSauce

For this manicure, I didn't have anything in mind.  All I knew I wanted to do was use tape to do a criss-cross on my thumbs.  First, I painted all my nails green.  Then, on all the nails except for the thumb, I painted a purple moon that took up the top 2/3 of the nail. After that dried, I used the same green to paint a smaller moon that took up the top 1/3 of the nail.  I know I could have just painted a purple stripe in the middle, but as I said before, I had nothing in mind, and if I did that the stripes might not be as curved.  On the thumb, I aligned the tape in criss-cross position and painted the purple.  It did not turn out the way I thought it would because I didn't cut the tape skinny enough, but the green and purple are a pretty striking combo.


April 14, 2013

Geometricly Coral

Coral is a great color for spring and is in this season.  I matched the color with a sparkly gold polish.  I started with the coral polish on all the nails as a base color.  The perfect coral color for me would only have the smallest amount of orange mixed in with the pink, and this color matched my taste well.  Then, I painted some French Tips for all the nails except for the thumb, and on that one, I used some tape and painted a gold triangle.  And finally, a top coat for the final touches. 

I did paint a top coat on all my nails, but for some reason, this picture captured most of my nails matte. 

The nails look a lot more shiny.

Don't coral and gold match up perfectly?


April 7, 2013

Marbled Nail Sticker

This was my first time water marbling!  By the way, water marbling is just swirling a bunch of different colors in water to make what is in the picture below.  If you still don't understand what I'm talking about, search it up on Youtube before you read this.  
I could never get the right water temperature, so the polish would keep on drying out before I could draw a design into it.  After a few tries, I got this design in the water, but I didn't feel like placing my nails into it yet, so I turned it into a nail sticker to save it for later.  Another nail sticker I made-it wasn't as pretty-cracked.
Usually when people make a design in the water, they only use it for one nail, but this sticker could fit about 3-4 nails.  Plus, this way isn't as messy as water marbling, so it is way better.

I used the colors: light green, light purple, and hot pink.  The design wasn't anything in particular.


March 25, 2013

Arrow Tips Tutorial

For some reason this post got reverted to a draft, so I'm reposting it.  This is the tutorial for the Arrow Mani I did a while ago.  This manicure does get a little messy.  You will need two nail polishes and a top coat.   


Paint on your first color.


Paint half the arrow with your second color.
Paint on the other half.  Add extra decorations and paint on a top coat.

Whitening Nails DIY

Whiten Those Nails!
Materials: Old toothbrush and some whitening toothpaste


Steps

  1. Remove all polish from your nails if you have any
  2. Squeeze some toothpaste onto your brush and scrub all your nails
  3. Wash off the toothpaste
You don't need to use whitening toothpaste; baking soda, whitening strips, mouthwash, and hydrogen peroxide work too.


***(I got the picture above from the web)

Fit For a Princess

This mani is made up of neutral tones, and nothing too bright.  I started out with a mood changing pink on all my nails but my thumb.  The pink turns dark when your body temperature is hot and vice versa.  Then, on all the pink nails, I painted gold tips.  I sponged a silver ombre only on the moons of my ring fingers, and it kind of looks like it's raining shooting stars.  Finally, I painted the thumbs gold, with a pink tip.  You wouldn't be able to see the pink tips from afar, but it gives the gold a pink glow.

March 18, 2013

Blue Sparkle Ombre Mani

This is a cute manicure that welcomes Spring.  Did you know that today is the last Monday of winter?  Anyway, I started off with two coats of a light blue pastel  Then, I decorated the tips with a glitter ombre.  Initially, I wanted to do the ombre on the moons, but since it's my first time doing any kind of ombre I just stuck to the tips.  The only thing I wish I would have done differently is start the ombre a little higher.  Other than that, it was perfect because I love anything with glitter.

March 10, 2013

Easy Manicure/Pedicure DIY

1.Trim nails with nail cutter
2.Remove all nail polish from nails
3.Take an old toothbrush and some whitening toothpaste and scrub your nails to whiten them
4.Take a four way filer and take the roughest parts to file your nails
5.Buff your nails with the rest of the parts to make them smooth and shiny
6.Moisturize the skin around your nails with Vaseline
7.Wait for five minutes and wash it off with soap
8.Optional-Paint your nails with a clear coat

Yay! You have just given your nails a makeover!

March 3, 2013

Dresses vs Manicures Vol. 1


These dots remind me of my Layered Valentine Dots Mani.  The random dots filling up the whole dress looks really similar to my manicure, although the color schemes are very different.  
This dress looks like it has been painted by watercolors, and to achieve this effect on your nails, just dilute the nail polish with remover and paint it on.

Dresses vs Manicures

This is a new thing I'm going to do where I compare dresses and sometimes jewelry to my manicures.  Hope you like it!

February 24, 2013

Opening Up

Instead of just posting about nail polish, I am going to start posting about make up, clothes, etc.  I just wanted to let you know before I did a post on any of that stuff.

February 22, 2013

Splatter Paint Tutorial

This is the tutorial for how to splatter paint.  I did it with some paints on a poster instead of my nails that day.

Materials: Straw, nail polishes, top coat, nail polish remover, and some paper towels

Steps

  1. Layout the paper towels because splatters can get everywhere.
  2. Drop some nail polish on the towels and dip one end of the straw in the polish.  Make sure the straw's end is fully covered.
  3. Blow into the straw and onto your nail.
  4. Repeat for all the other colors.
  5. Paint on a top coat.
  6. Clean up your fingers with the remover.

February 20, 2013

Splatter Paint

This was a poster I splatter painted for school, but this can also be a technique used as nail art.  Although it can get really messy, this was super fun and pretty.  I actually only used 3 colors, red, blue, and white, but I mixed 6 colors, purple, blue, red, and all the lighter versions of those colors.  I really love the medium-sized blue splatter with the two little squigglies acting like legs on the bottom right-hand side.  It's so unique.  I'll have the tutorial posted soon.


February 17, 2013

Stop Flyaways When You're Trimming Your Nails Tip

There are two ways that help me. First, I like the wet my nails before I cut them. It's hard to explain why, but you have to try it first to know. The best way is to tape the sides of the nail cutter. It traps all the flyways. When you're done, take off the tape, which will have all your trimmed nails on it, and throw it away. Here is a picture to explain what I'm talking about. It's hard to see the clear tape, but I just taped the opening.

February 12, 2013

Layered Valentine Heart Tips Tutorial


For my Valentine Mani I painted these tips on my ring finger.  It kind of looks like I ran a toothpick through the middle of three straight tips because they're curved.  


Materials: a dark red polish, 3 shades of pink polish, dark, medium and light, and a top coat

Steps

  1. Paint on your dark red polish as a base color
  2. Take your darkest pink polish and paint a curved "v" or tip of a heart.  The tip should take up half of your nail.  
  3. Take your medium pink polish and paint the same thing.  That should take up 2/3 of your first tip (dark shade).
  4. Do the same with your light pink polish and it should take up 2/3 of you second tip (medium shade).  This might take two coats.
  5. Finally paint on a top coat.


Here's a close-up of the hearts

Here's the full mani

February 11, 2013

Layered Valentine Dots Tutorial

Here is the tutorial for the all the nails but the ring finger.  I think it's super cute and really vibrant.  It's perfect for Valentine's Day.  I love how each nail is unique with this look.


Materials: toothpick, 4 shades of pink polish, 3 shades of purple polish, and a red polish


Steps
  1. Dot on some pink dots on all the nails before moving on to the next color
  2. Do at least five dot of each color
  3. Then dot on some purple dots on all the nails before moving on to the next color
  4. Make sure you alternate between colors, because if you do all pinks and then all purples, the pink dots won't show up


February 10, 2013

Valentine Mani 2013

I did a Valentine Mani for the upcoming holiday <3.  I used shades of pink, purple, and red.  The layered dots really stand out from afar.  I just realized I layered many thing in this manicure, the dots and the heart tips on the ring finger.  I will have the tutorial posted for the two separate arts tomorrow and the next.  Here are the links to the Layered Valentine Dots and Layered Valentine Heart Tips.


Here is a close up of my ring finger.  I used 3 shades of pink to create the tip.  This is the Layered Valentine Heart Tips Nail Art.
This is the art I did on the rest of my nails.  I call it the Layered Valentine Dots Nail Art.  I just overlapped many dots to create this look.


February 8, 2013

Cut-Out Heart DIY

This is perfect for Valentine's Day.
  1. Fold a piece of tape so it has sticky corners sticking out.  You don't want to fold it in half because you won't be able to open it later.
  2. Draw half a heart on one side of the crease.
  3. Cut out the heart.
  4. Open the tape slowly, so it doesn't rip.
Here is a picture of the tape with half of a  heart drawn on it but not cut out, so you can see what it looks like.


January 30, 2013

Suggestions for Nail Art

Please leave suggestions for nail art looks in the comment section below.  I reply back to you as soon as possible.

January 29, 2013

Refresher for Arrow Nails

This nails were the same arrow nails I posted two posts ago. Only the silver part was left and I thought painting on some sparkles would be cute. I painted on two layers of Flashing Lights by Funky Fingers. All the nail polish on my pinky fell off, so I painted on a blob of silver to look like it chipped and then some sparkles. I think the imperfection is super cute, and the sparkles just added a nice touch.

January 26, 2013

Arrow Tips Manicure

All that talk about tips made me want to do a manicure with them. For this look, I painted on two coats of Silver Dollar by Revlon as a base. Then, I painted on the blue tips and added some sparkles. The silver is holographic, which makes the blue tips stand out. I have the tutorial posted right here.


January 21, 2013

Rounded vs Squared Tips Pt 2

Part 2 will be about squared tips. To get squared tips you'll need a special nail cutter with a straight blade. I tried switching from rounded tips to squared tips before, and it didn't work out well. I had to let my nails grow out longer, so the edges could be cut too. However, my nails are brittle, so every time they got long, they chipped. Again, I would not recommend squared tips for people with brittle nails because the pointy edges will chip off.

January 19, 2013

Rounded vs Squared Tips Pt 1

In this post, I'll be discussing about rounded tips.  They are fast to do and don't need a fancy nail cutter.  These are especially for brittle nails, because the sides will chip off if they are squared.  The only con about rounded nails is that sometimes they can be cut unevenly.  I prefer rounded tips to squared tips.

January 14, 2013

DIY Getting Rid of Crusty Nail Polishes

I have this one nail polish I can't open, so I thought I'd do a DIY to fix these problems.  You can prevent this by cleaning your nail polishes before they get hard to open.
Materials: A crusty nail polish, nail polish remover, paper towel
Screw open your polish.  If it's stuck, try using a regular towel (not shown above).  Set the cap aside and clean the opening and inside of the cap with remover.  It doesn't have to be perfect, just clean enough so you can open it.


January 12, 2013

5 Nail Resolutions

Starting off the new year with some resolutions.  Hopefully, I can keep them until the end of the year.

  1. Keep nails trimmed
  2. Stop picking off nail polish
  3. Always moisturizer cuticles
  4. File nails, never clip them
  5. Wait patiently between for each nail polish layer to dry before applying the next

January 8, 2013

Accent Nail Survey

An accent nail has the nail art that stands out or is different from all the others.  This survey I made can tell me which nail to do more tutorials on.  I prefer my accent nail to be my thumb or ring finger.  Just click on the green 'survey' to get to the link.

Here's the link just in case it doesn't work: https://docs.google.com/spreadsheet/viewform?formkey=dExNb3hodFhQRXFqZW8xZk90cWdUdnc6MQ

January 6, 2013

DIY Barrette


I get so annoyed when barrettes with plastic on them chip off. People usually throw them away; I would too, but now you can customize your own hair clips after the plastic falls off with this new DIY.

Make sure there is no plastic on the barrette.
You can remove the plastic easier by soaking it in salty warm for a minute.


Materials: Nail polish, clear polish, and a chipped barrette
Open the barrette.  That way you can hold it without getting nail polish on your fingers.

Paint your base coat.

Wait for a few minutes before adding decorations.
Paint a top coat and your done!
You should wait a few days for it the fully dry before closing the barrette and using it.

January 3, 2013

Make This Barrette

Customize your own barrette with any pattern only using a couple of colors.  I just painted on some stripes, but you can do a solid color, cheetah print,  polka dots, etc.  I made this draft a long time ago to prepare for a busy time, so I might not get the tutorial posted until next week :>